Container Security in AWS
Containerization has become a popular trend in software development, and its origins stretch as far back as 1979, stemming from Unix chroot. It is a widely adopted technology because it enables the simplified deployment and scaling of applications across different computing environments. AWS is a popular choice for cloud-based container workloads, with 80 percent of cloud-hosted containers running on AWS. A survey in 2021 found that, on average, 50% of applications use containers, but uncertainty around container security was cited as a common inhibitor to further adoption. This article will review the primary security considerations during the preparation, deployment, and running of Amazon Web Services (AWS) containers.
Executive summary
As with any cloud-based technology, you should implement and understand security best practices during all stages of the container development lifecycle. Container security is a broad topic, and this article will focus on the following:
| Topic | Description |
|---|---|
| container threat modeling | security should be assessed throughout the lifecycle of your containers. Threat modeling is a helpful way to frame container security |
| container development using services on AWS | we will cover which services are available on AWS for container workloads and help you understand your security responsibilities |
| observability | closely observing your container workloads helps identify anomalous behavior |
Container threat model
In the AWS Well-Architected Framework, threat modeling is a best practice within the Security Pillar. You should perform threat modeling at the workload level, considering the specific needs and aims of your containers. For example, you could classify your container workloads by their business value and then perform threat modeling based on:
- assets – this could be the data used by your workflows. How sensitive is this data?
- actors – these are internal and external individuals, including malicious insiders, developers, and hackers.
- entry/exit points – the data flow as it moves through your workload. What connections do your applications make with internal and external systems? Malicious external actors could exploit these entry points.
Ultimately, the output of threat modeling is a risk matrix used to measure whether the identified threats are adequately mitigated. The following sections of our article will consider assets, actors, and entry/exit points for a typical container development workflow.
Container development workflow
A typical container development workflow involves the following steps:
- Coding an application
- Building a container image
- Pushing the image to a registry
- Running the container
This workflow is not linear. Steps 1-4 will be revisited multiple times during container development, especially when reviewing security vulnerabilities.
1. Coding your application
The most relevant actors at this point are your developers. They must analyze their code, including any 3rd party dependencies, for vulnerabilities and insecure practices. Information about Docker container security is available in the Docker security guide, and AWS Services, like Amazon CodeGuru Reviewer, can help analyze your code via automated recommendations.
Imagine that your containerized application needs to connect with an AWS service. A runtime IAM role can actually supply the application with any required connection credentials. We will demonstrate this useful technique shortly when we deploy a containerized Python script.
If your code needs to connect to other services using credentials, then AWS Secrets Manager or AWS Systems Manager Parameter Store are recommended. In this way, you can avoid hard-coding the credentials.
2. Building a container image
You will typically build your container images using a preexisting base image, which could immediately increase your risk exposure. External actors may deliberately or mistakenly include security vulnerabilities within published images. Security vulnerabilities in public container images have been well-documented. An analysis of around 4 million Docker Hub images by cyber security firm Prevasio found that 51% of the images had exploitable vulnerabilities. See here for details. Ensuring that base images are from a trustworthy source is fundamental to container security.
Amazon Elastic Container Registry (ECR) is a service you can use to store your organization's container images. Instead of using public container images from unknown sources, you can access approved and trustworthy base images stored on Amazon ECR. You can then grant your developers access to these container images via Amazon Identity and Access Management (Amazon IAM).
3. Pushing the image to the registry
Once you build your container image, you will push it to a container registry so it is ready for deployment. Docker Hub is a very popular container registry, but Amazon ECR also integrates with other AWS Services, like Amazon IAM.
Scanning container images for vulnerabilities is a recommended security best practice and there are several security scanning tools available. Amazon Inspector is an automated vulnerability management service integrated with Amazon ECR. You can configure vulnerability scans on each container image pushed to Amazon ECR.
4. Running the container
Now that you have created your container, you are ready to run it via a container orchestration system. Orchestration helps to automate much of the operational effort required to run containerized workloads. AWS has two services for container orchestration:
Both services integrate with AWS Fargate; a serverless container compute engine. While you could run your container workloads directly on Amazon EC2 instances, you have the additional overhead of ensuring that the EC2 instances are kept up-to-date with security patches. With AWS Fargate, AWS is responsible for patching, allowing you to focus on other security matters.
During development, you should understand the expected runtime behavior of your containerized application. Logging and monitoring your containers helps identify abnormal behavior, and some solutions can even provide active protection that prevents malicious activity. See the AWS Marketplace for Containers for a list of third-party observability solutions.
Container deployment walk-through
During this walkthrough, we will containerize a Python application, which will involve the following steps:
- create a Python script
- create an Amazon ECR repository, which will require:
- an AWS Account
- AWS Command Line Interface (AWS CLI) with an IAM user
- running Docker daemon
- build and deploy the Docker image
- run the container
Creating our Python application
For this article, we are going to create a basic Python application that writes a file to Amazon S3.
import os

import botocore

import boto3

print('Container is running')

print(os.environ["AWS_CONTAINER_CREDENTIALS_RELATIVE_URI"])

s3_client = boto3.client('s3')

html = "<h2>Hello World</h2>"

try:

s3_client.put_object(Body=html, Bucket='<bucket_name>', Key='foo.html', ContentType='text/html')

print('Uploaded file to S3')

except botocore.exceptions.ClientError as error:

# Put your error handling logic here

raise error

except botocore.exceptions.ParamValidationError as error:

raise ValueError('The parameters you provided are incorrect: {}'.format(error))
This script uses Boto3, the Python SDK for AWS, to write an HTML file to an Amazon S3 bucket. The bucket is called demoforarticle. The entry point for this script will be the manual starting of the container. Our example could be modified to auto-trigger the container based on an event, process the input data, and then write an output file to Amazon S3. Amazon S3 is an exit point for our application, as are the print statements sent to Amazon CloudWatch. From a security perspective, we should ensure that the S3 bucket follows security best practices and check that the print statements are not exposing sensitive data to CloudWatch.
This script does not contain AWS credentials, and the environment variable, AWS_CONTAINER_CREDENTIALS_RELATIVE_URI, will not be set on your local environment. The Amazon ECS agent will populate this once we correctly configure our AWS container environment.
Create an Amazon ECR repository
Start by opening the AWS Management Console and finding the Amazon ECR Service from:
- Services > Containers > Amazon Elastic Container Registry
- Choose Repositories
- Then locate the Private tab and click Create Repository.
- Provide a unique name for your repository. In this example demoforarticle
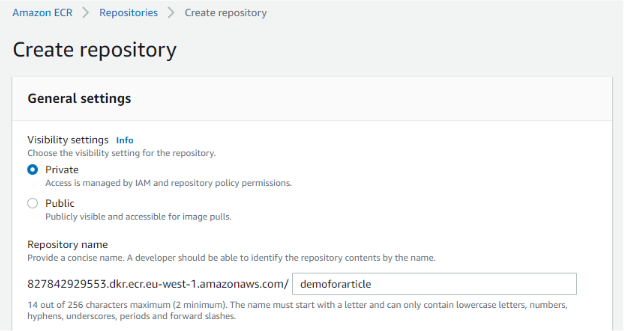
Image shows creating an Amazon ECR Private repository demoforarticle
A recommendation for production environments is to prepend the repository name with a namespace to group into categories, for example, <group-name>/<repository-name>. Categorization is helpful when granting access via Amazon IAM policies.
The Tag immutability setting prevents image tags from being reused with other images. The AWS documentation on Image tag mutability provides further details.

Tag immutability prevents overwriting existing images
The Image scan settings option can be enabled during repository creation to Scan on push. However, the information message (below) shows that this has been deprecated in favor of registry-level scan filters. We will review image scanning in more detail later in the article.

Scan on push for all repositories has a deprecation warning
Under Amazon ECR, we now see a private repository called demoforarticle.

The private repository is visible from the Amazon ECR Management Console
Install the AWS CLI
During the following steps, we will interact with Amazon ECR programmatically, and for this, we require the AWS Command Line Interface (AWS CLI). AWS CLI is available for Linux, macOS, and Windows. The following examples are from Windows 11. You can check the version of the AWS CLI via:
aws --version

aws-cli/2.2.11 Python/3.8.8 Windows/10 exe/AMD64 prompt/off
Using Amazon ECR via the AWS CLI requires AWS credentials. If you are unfamiliar with creating IAM users, see here. The required user type is programmatic access, which provides you with an access key ID and secret access key for the AWS CLI. The following policy enables interaction with AWS ECR via the AWS CLI.
{

"Version": "2012-10-17",

"Statement": [

{

"Effect": "Allow",

"Action": [

"ecr:BatchGetImage",

"ecr:BatchCheckLayerAvailability",

"ecr:CompleteLayerUpload",

"ecr:DescribeImages",

"ecr:DescribeRepositories",

"ecr:GetDownloadUrlForLayer",

"ecr:InitiateLayerUpload",

"ecr:ListImages",

"ecr:PutImage",

"ecr:UploadLayerPart"

],

"Resource": "arn:aws:ecr:::repository/<repo_name>"

},

{

"Effect": "Allow",

"Action": "ecr:GetAuthorizationToken",

"Resource": "*"

}

]

}
Install Docker
To run Docker on Windows, we must first install the Windows Subsystem for Linux (WSL 2). WSL 2 is installed via the Windows Command Prompt.
>wsl --install

Installing: Virtual Machine Platform

Virtual Machine Platform has been installed.

Installing: Windows Subsystem for Linux

Windows Subsystem for Linux has been installed.

Downloading: WSL Kernel

Installing: WSL Kernel

WSL Kernel has been installed.

Downloading: GUI App Support

Installing: GUI App Support

GUI App Support has been installed.

Downloading: Ubuntu

The requested operation is successful. Changes will not be effective until the system is rebooted.
After rebooting, the WSL installation has been finalized.
Windows Subsystem for Linux is resuming a previous installation...

Installing: Ubuntu
Docker Desktop is installed by Double-clicking the downloaded Docker Desktop Installer.exe.
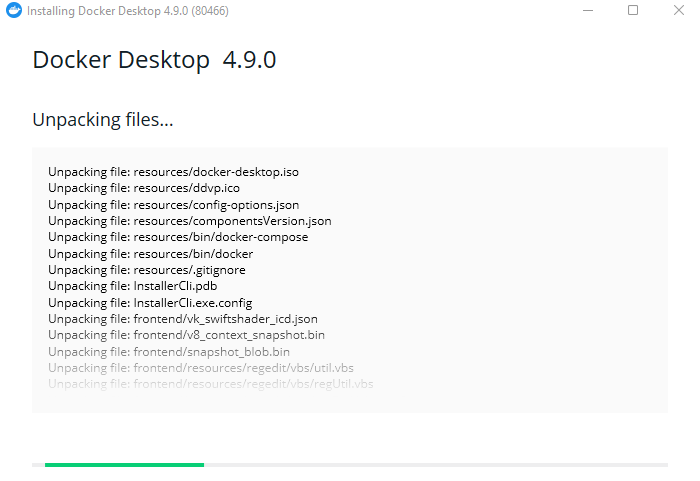
Docker Desktop installation summary
Once Docker Desktop installs and the Docker daemon is running, you can check what local Docker images are available as below.
> docker images

REPOSITORY   TAG       IMAGE ID   CREATED   SIZE
If the Docker daemon is not running, you will see an error message and will need to open Docker Desktop.
docker images

error during connect: This error may indicate that the docker daemon is not running.: Get "http://%2F%2F.%2Fpipe%2Fdocker_engine/v1.24/images/json": open //./pipe/docker_engine: The system cannot find the file specified.
The steps above are covered in more detail here.
You can use Docker Hub to find base images to help develop your containerized applications. Use the Trusted Content filters to find trustworthy images. We will start using Python – Official Image | Docker Hub.
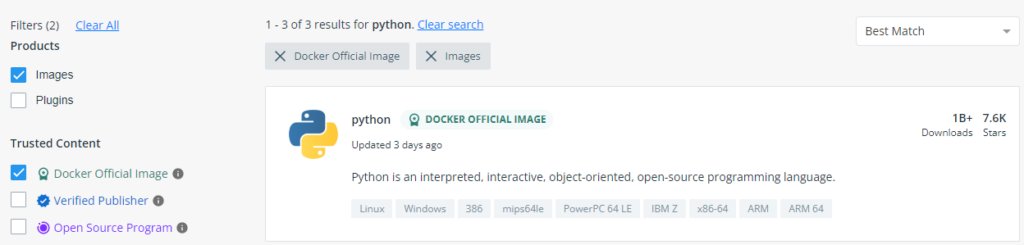
Trustworthy images should be used, e.g., Docker Official Images
We can view the available tags from the official Python image page here. You can read more about these Image Variants from the description tab.

The python Docker Official Image
In this article, we will use the images tagged slim–buster and slim-bullseye.
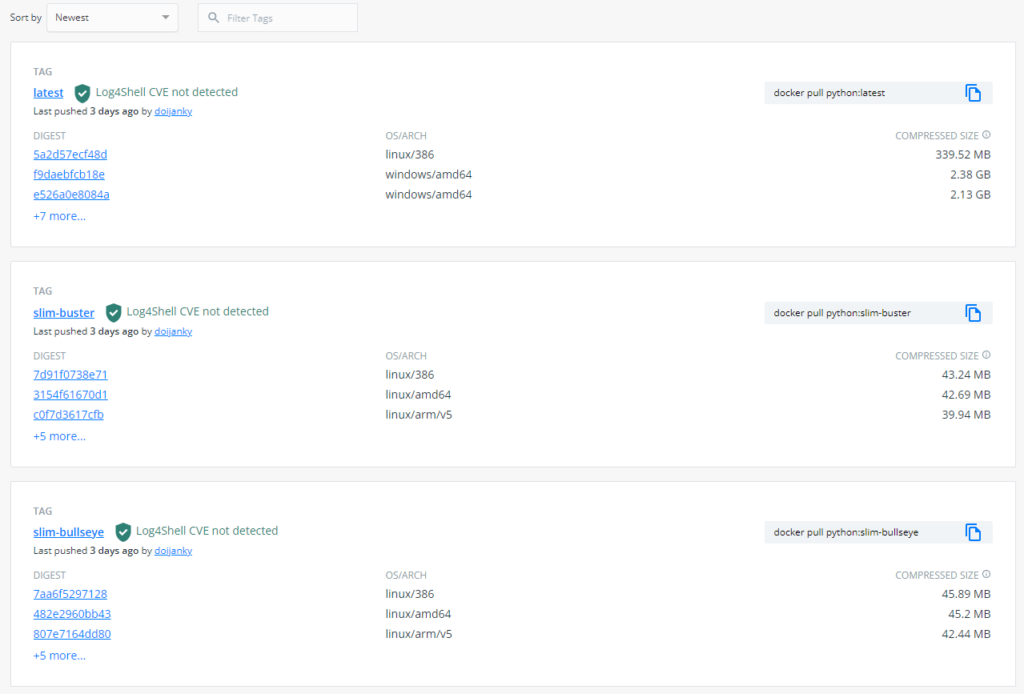
The tags provide a summary of the image sizes, and Docker pull commands
The tags show the Docker pull command used to download a local image. To begin with, we will retrieve the python:slim-buster image.
> docker pull python:slim-buster

slim-buster: Pulling from library/python
Within Docker Desktop, you will see a new local image, and the same image ID can be seen when using the docker images command.
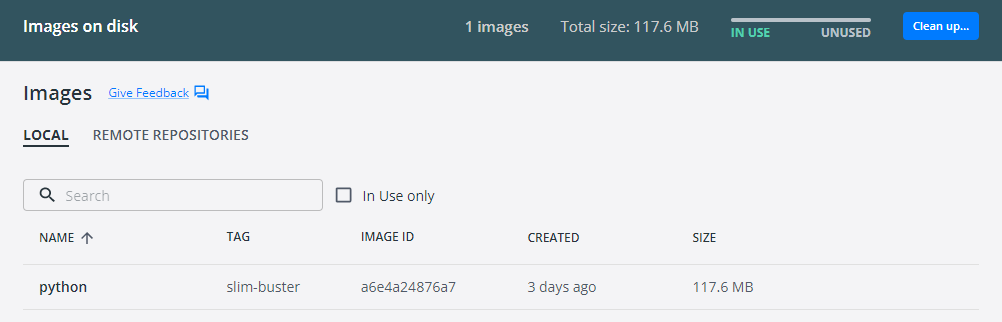
You can view your local images in Docker Desktop
Docker can scan local images for vulnerabilities using Snyk Engine and requires a Docker Hub ID and consent to scan.
> docker scan python:slim-buster

Docker Scan relies upon access to Snyk, a third party provider, do you consent to proceed using Snyk? (y/N)

y

failed to get DockerScanID: You need to be logged in to Docker Hub to use scan feature.

please login to Docker Hub using the Docker Login command
Once you login you will see output like the following:
> docker scan python:slim-buster

Testing python:slim-buster...

✗ Low severity vulnerability found in util-linux/libuuid1

Description: Integer Overflow or Wraparound

Info: https://snyk.io/vuln/SNYK-DEBIAN10-UTILLINUX-1534833

Introduced through: util-linux/libuuid1@2.33.1-0.1, e2fsprogs@1.44.5-1+deb10u3, util-linux/mount@2.33.1-0.1, util-linux/fdisk@2.33.1-0.1,

...

Package manager:   deb

Project name:      docker-image|python

Docker image:      python:slim-buster

Platform:          linux/amd64

Base image:        python:3.10.5-slim-buster

Tested 94 dependencies for known vulnerabilities, found 81 vulnerabilities.
Let’s push this local image to Amazon ECR and compare the vulnerability scanning results afterward. Start by authenticating your Docker client to the Amazon ECR registry where you intend to push your image. This command uses the profile containers, which contains the AWS credentials created earlier.
> aws ecr get-login-password --region eu-west-1 --profile containers | docker login --username AWS --password-stdin <account>.dkr.ecr.eu-west-1.amazonaws.com

Login Succeeded
We need to tag the image with the Amazon ECR registry, repository, and optional image tag name. For example: aws_account_id.dkr.ecr.region.amazonaws.com/<repository_name>:<optional_tag>
The repository name should match the repository created previously, demoforarticle.
The Image ID, a6e4a24876a7, is used to tag this image with <account>.dkr.ecr.eu-west-1.amazonaws.com/demoforarticle:python-slim.
docker tag a6e4a24876a7 <account>.dkr.ecr.eu-west-1.amazonaws.com/demoforarticle:python-slim
The Image ID, a6e4a24876a7, was obtained from the docker images command.
> docker images

REPOSITORY     TAG         IMAGE        ID       CREATED  SIZE

python     slim-buster   a6e4a24876a7   2  days ago   118MB
Repeating the docker images command will show that we have created a new local image that’s ready to be pushed to Amazon ECR.
> docker images

REPOSITORY                                               TAG         IMAGE        ID       CREATED  SIZE

<account>.dkr.ecr.eu-west-1.amazonaws.com/demoforarticle   python-slim   a6e4a24876a7   2  days ago   118MB

python                                                   slim-buster   a6e4a24876a7   2  days ago   118MB
Now the image can be pushed to Amazon ECR using the following command.
> docker push <account>.dkr.ecr.eu-west-1.amazonaws.com/demoforarticle:python-slim

The push refers to repository [<account>.dkr.ecr.eu-west-1.amazonaws.com/demoforarticle]
We can see the pushed image in the Amazon ECR Management Console.
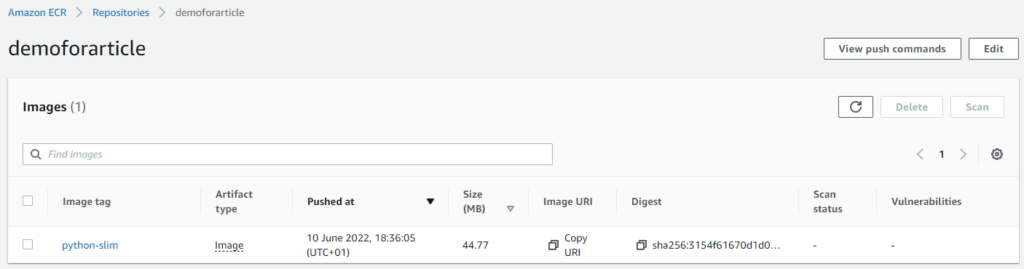
The newly pushed image is visible in the repository
Within Amazon ECR, we can manually scan the image by selecting it and clicking Scan. The Scan status column shows In progress and Vulnerabilities reveals no findings.
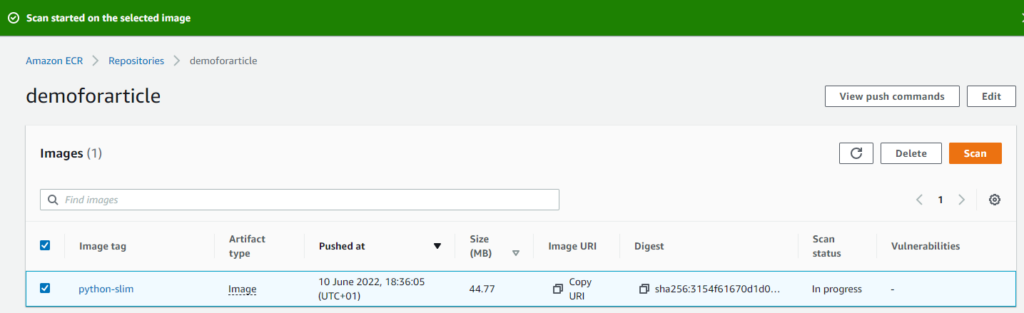
The notification message shows that a scan is In progress
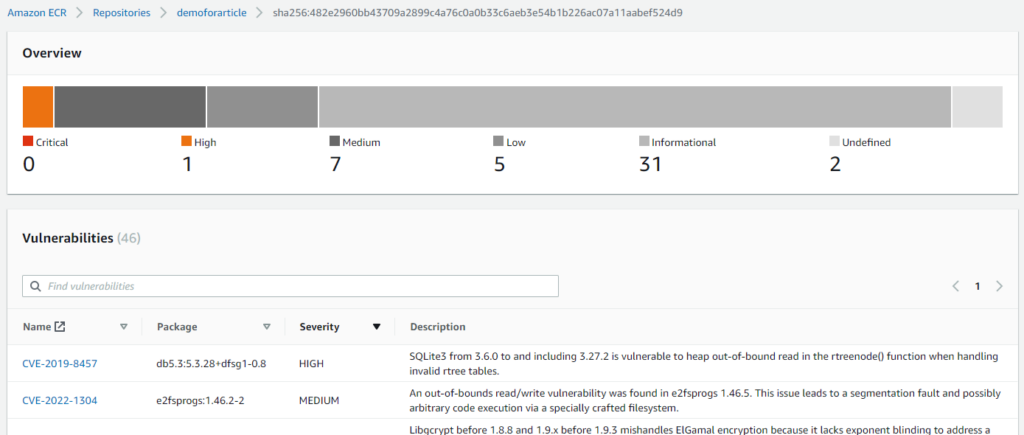
After the scan has completed, the vulnerabilities column will link to an overview page, and the vulnerabilities found will be grouped by Critical, High, Medium, Low, Informational, and Undefined.
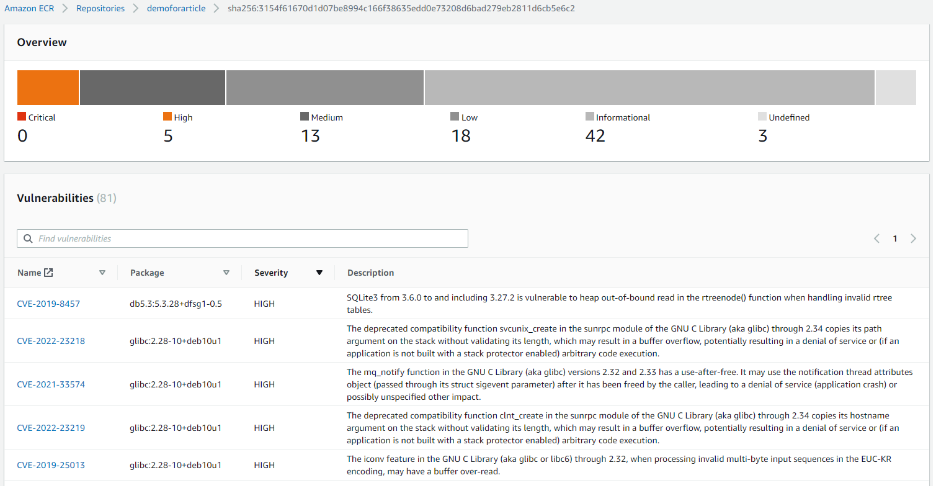
After the vulnerability scan completes a summary graphic and table are produced
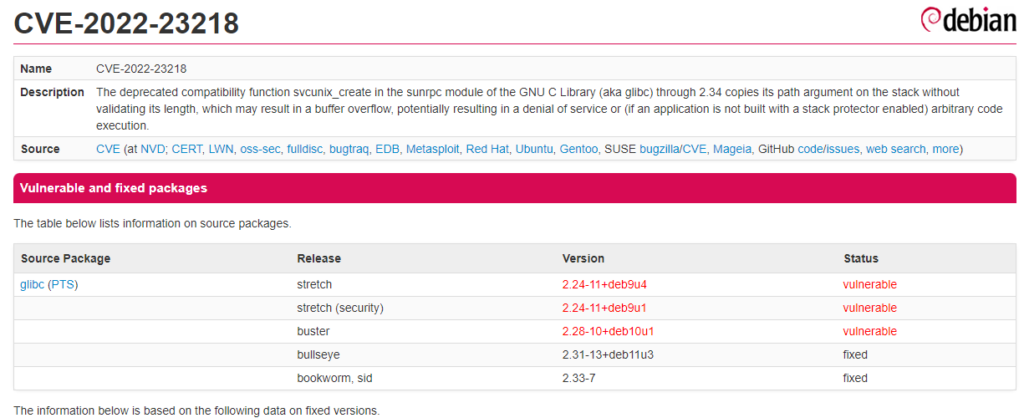
You can see a link that provides further information when clicking on a vulnerability name. For example, we can see that vulnerability CVE-2022-23218 is fixed in release Bullseye.
Following link shows detailed information about the vulnerability
From the docker scan command, the High severity vulnerability was:
✗ High severity vulnerability found in gcc-8/libstdc++6

Description: Information Exposure

Info: https://snyk.io/vuln/SNYK-DEBIAN10-GCC8-347558

Introduced through: gcc-8/libstdc++6@8.3.0-6, apt@1.8.2.3, meta-common-packages@meta

From: gcc-8/libstdc++6@8.3.0-6

From: apt@1.8.2.3 > gcc-8/libstdc++6@8.3.0-6

From: apt@1.8.2.3 > apt/libapt-pkg5.0@1.8.2.3 > gcc-8/libstdc++6@8.3.0-6

and 2 more...

Image layer: Introduced by your base image (python:3.10.5-slim-buster)
If we repeat the steps above using python:slim-bullseye, we can confirm that the vulnerability was addressed.
> docker pull python:slim-bullseye
docker tag b59170d6b634 <account>.dkr.ecr.eu-west-1.amazonaws.com/demoforarticle:python-slim-bullseye
> docker push <account>.dkr.ecr.eu-west-1.amazonaws.com/demoforarticle:python-slim-bullseye
Performing a manual image scan now shows fewer vulnerabilities, and the CVE-2022-23218 vulnerability is no longer listed.
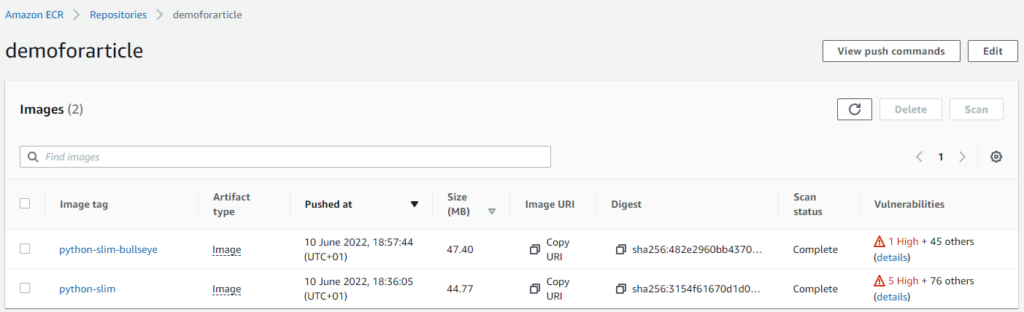
Two base images pushed to the Amazon ECR repository with a summary of the vulnerabilities
It is worthwhile comparing results between the Amazon ECR and Docker scanning features. Amazon ECR uses the Common Vulnerabilities and Exposures (CVEs) database from the open-source Clair project, whereas Docker scan uses the Snyk engine, so different results are expected.
After the scan completes, the vulnerabilities discovered are summarized
docker scan python:slim-bullseye

Base Image                  Vulnerabilities  Severity

python:3.10.5-slim-bullseye  46              2 critical, 0 high, 0 medium, 44 low

Recommendations for base image upgrade:

Alternative image types

Base Image                  Vulnerabilities  Severity

python:3.11.0b1-slim-buster  81              0 critical, 1 high, 0 medium, 80 low

python:3.11-rc-slim-buster  81              0 critical, 1 high, 0 medium, 80 low
It is best to use one of the recommended Alternative image types at this stage. But for demonstration purposes, we will continue with the python:slim-bullseye image.
|
Platform
|
Provisioning Automation |
Security Management |
Cost Management |
Regulatory Compliance |
Powered by Artificial Intelligence |
Native Hybrid Cloud Support
|
|---|---|---|---|---|---|---|
|
AWS Native Tools |
✔
|
✔
|
✔
|
|||
|
CoreStack
|
✔
|
✔
|
✔
|
✔
|
✔
|
✔
|
Scan on push
Adding a scanning configuration enables the scan on push of images. For example, we can use a filter of dev/* to scan images when pushed to the dev repository group. Basic scanning is free, but Enhanced scanning has additional costs. The differences between the scan types are available in the Amazon Inspector FAQs.
With IAM policies, you can control who has access to Amazon ECR and to what degree. Best practice dictates that fewer team members should have permission to push images than pull them.
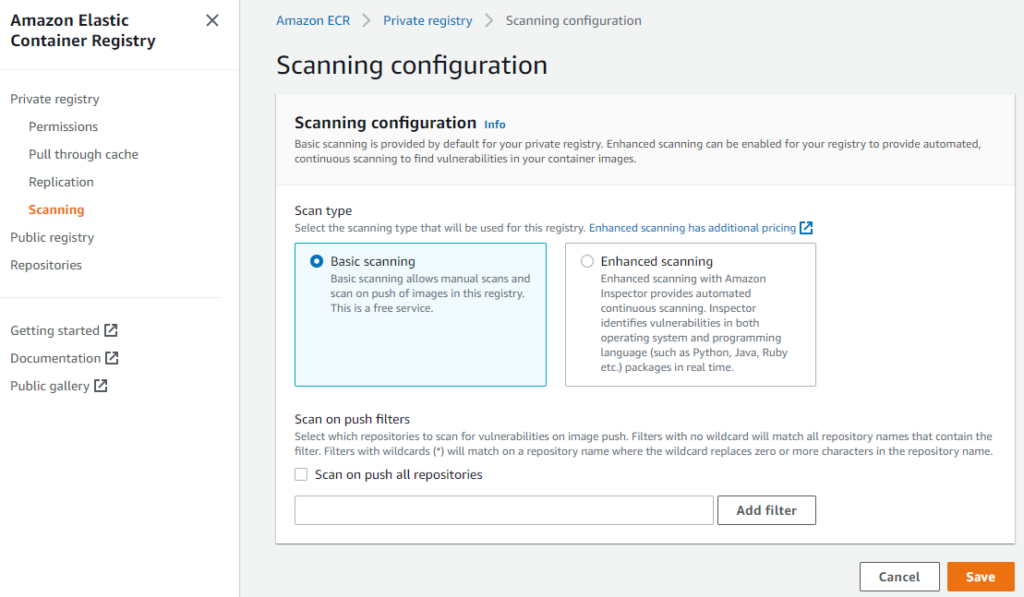
You can define a scanning configuration using repository-level filtering
Building and deploying the Docker image
So far, we have looked at deploying a base image to Amazon ECR and scanning it for vulnerabilities. In this section, we will containerize the Python script and deploy it. We start by creating a folder with the following three files:
Dockerfile: commands that Docker uses to build the image
# base image

FROM <account>.dkr.ecr.eu-west-1.amazonaws.com/demoforarticle:python-slim-bullseye

# Working directory

WORKDIR /app

# COPY the remote file at working directory in container

COPY requirements.txt requirements.txt

RUN pip3 install -r requirements.txt

COPY . .

# CMD instruction to run script

CMD [ "python", "./script.py"]
Requirements.txt: configuration file for Python packages. Ideally, this should specify the versions of libraries used.
botocore==1.27.7

boto3==1.24.7
Script.py: our Python script from above
From the Docker project folder, we can build and tag the Docker image:
> docker build --tag python-s3:v1 .
We then tag this image for deployment to Amazon ECR. We find the image ID by using the docker images command.
docker images

REPOSITORY              TAG                    IMAGE ID     CREATED       SIZE

python-s3  v1  68ecb63a643e   7 minutes ago   212MB
Then the image is tagged with the Amazon ECR registry, repository, and an optional image tag name.
docker tag 68ecb63a643e <account>.dkr.ecr.eu-west-1.amazonaws.com/demoforarticle:python-s3-v1

> docker images

REPOSITORY                                               TAG          IMAGE ID

<account>.dkr.ecr.eu-west-1.amazonaws.com/demoforarticle   python-s3-v1  68ecb63a643e
The image is then pushed to Amazon ECR.
docker push <account>.dkr.ecr.eu-west-1.amazonaws.com/demoforarticle:python-s3-v1
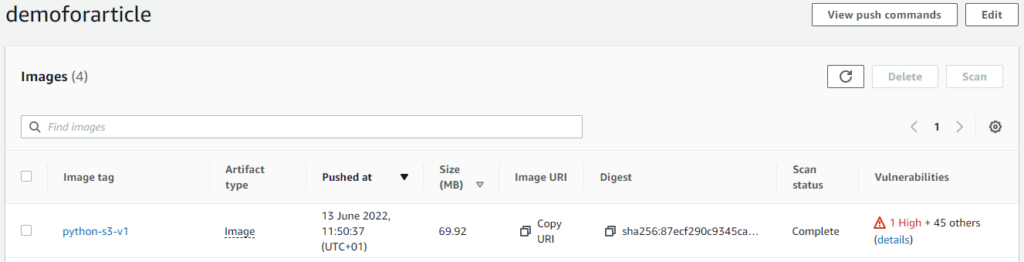
The pushed images are now available in our Amazon ECR repository
Running the container
To run our container, we need to create an Amazon ECS cluster, and an S3 bucket is required to receive the file created by the Python script.
Create an S3 bucket
Create an S3 bucket using the AWS documentation. Then update the Python script with your bucket name, and remember to reference the bucket name within the IAM policies (created below.)
Configure a cluster
From Amazon ECS, click Clusters and then Create Cluster. The cluster needs a name, in this case, demoforarticle.
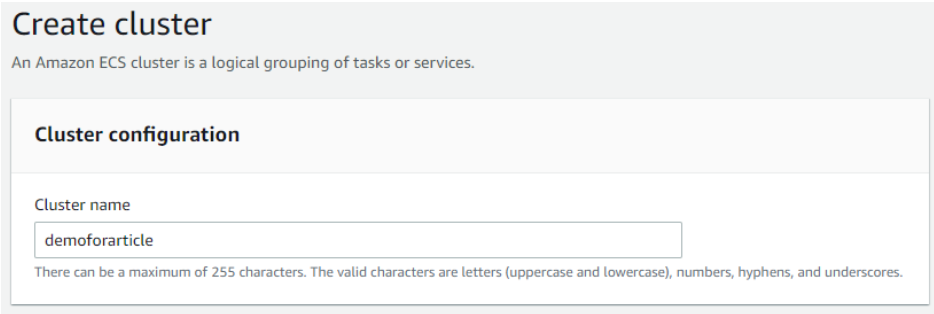
For this article, the Amazon ECS cluster is named demoforarticle
For network settings, use the defaults, and for Infrastructure, we use the AWS Fargate (serverless) option.
Create a task definition
A task definition is required to run Docker containers in Amazon ECS. From Amazon ECS, click Task definitions and then Create a new task definition.
The task definition needs to be named, and for this example, demoforarticle_task_no_role is used. At least one container needs to be defined, and this is a reference with a name and an Image URI. We can copy the Image URI from the Amazon ECR repository by clicking the Copy URI link from the Image URI column.

The task definition with reference to the container
Use a Linux operating system with a small CPU, and select low memory size for the Task Size.
As part of the task definition in Step 2, there is a task role parameter. Leave this as None for this first example. From the description, we can see that this enables the task to make AWS API calls, e.g., to S3. We will revisit this parameter later.
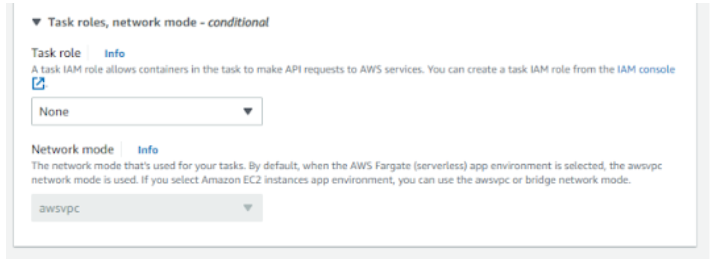
The task role is set to None for this task definition
Amazon CloudWatch is used for log collection with this task, but we can export logs to other AWS Services via AWS FireLens. It’s also possible to select Use trace collection and Use metric collection.
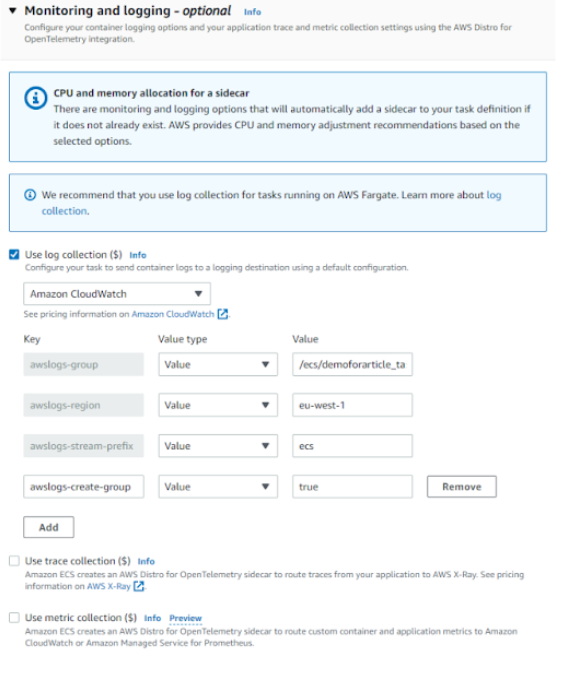
Use log collection is selected and Amazon CloudWatch is the logging destination
Run the task
From the new task definition, run the container by selecting Deploy and then Run task. This option runs the container like a batch service, whereas Create service is for long-running container workloads.
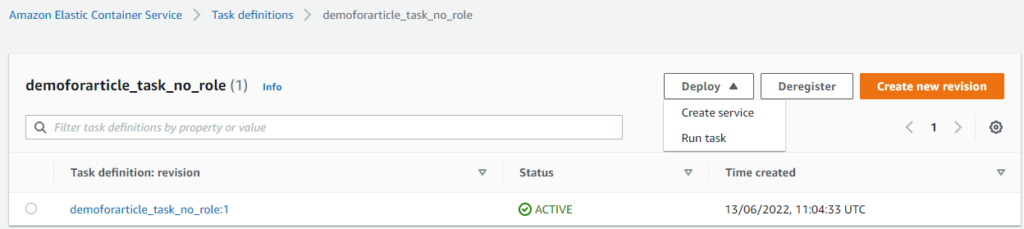
You can deploy the container from the new task definition by selecting Deploy > Run task
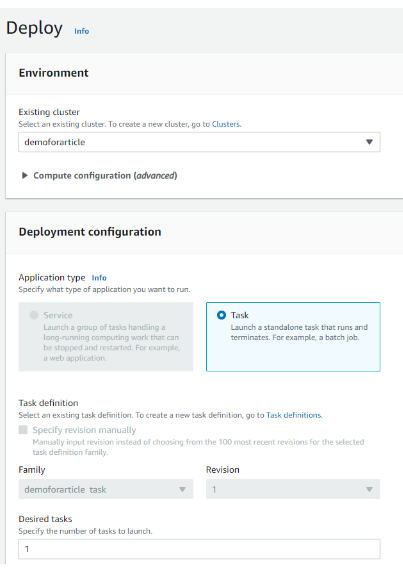
The cluster where the container will run needs to be specified via the dropdown. During this example, we will only launch one task.
Running the task on the Amazon ECS cluster
After clicking Deploy, the task status is shown on the Tasks tab of the Cluster Management Console. The Last status column will provide information about the Task lifecycle stage.
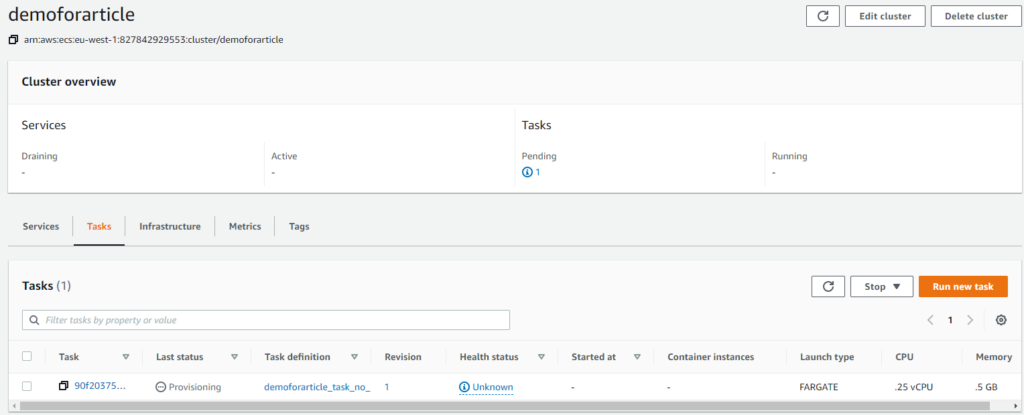
The new task in the cluster.
The logs produced from the task can be viewed by clicking on the Logs tab of the Task. We can also review logs from the Amazon CloudWatch Log groups. The Log group is automatically created when you make the task definition.
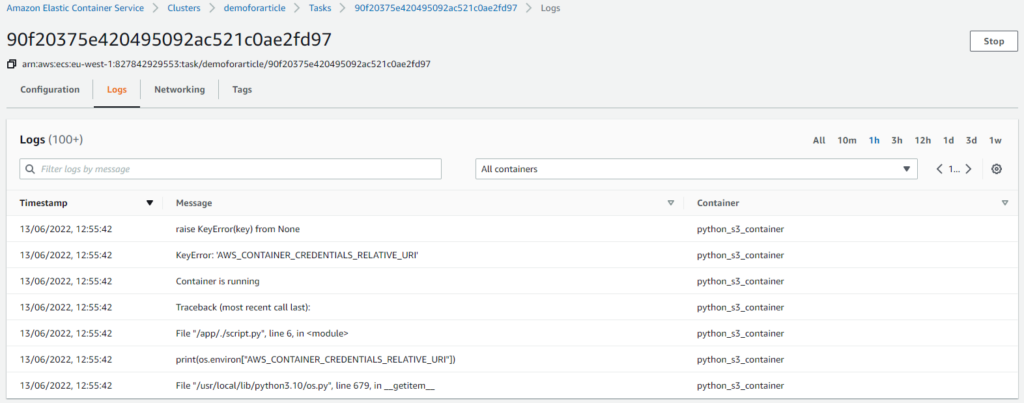
The CloudWatch logs show that errors occurred during the running of the container
We see errors in these logs, and the environment variable AWS_CONTAINER_CREDENTIALS_RELATIVE_URI has not been set.
Two IAM roles are relevant to task definitions: task execution and task role. A task execution role called ecsTaskExecutionRole was created when we built the task definition. You will find this in the IAM console, and this role uses the AmazonECSTaskExecutionRolePolicy AWS Managed Policy. The task execution role grants the Amazon ECS container and Fargate agents permission to make AWS API calls on your behalf. For running our container, this enables these services to retrieve the container images from Amazon ECR and write the logs to CloudWatch.
If our script had not had an error due to the environment variable, we would have observed a raise NoCredentialsError() error in the CloudWatch logs. Without a task role, the container cannot access AWS credentials to make calls to other AWS Services. To enable this, we need to create a task definition and set the task role the running container will adopt.
Create a task role
The containerized application can adopt AWS credentials at runtime by creating a task role. Create a policy from the IAM Management Console that can write to the S3 bucket.
{

"Version": "2012-10-17",

"Statement": [

{

"Effect": "Allow",

"Action": [

"s3:PutObject"

],

"Resource": [

"arn:aws:s3:::<bucket_name>/*.html"

]

}

]

}
The IAM role, created next, will use this policy. From the IAM Management Console, click Roles.
- Click Create role
- For the Select trusted entity section, choose AWS service.
- For the Use case, select Elastic Container Service, then the Elastic Container Service Task use case, and then choose Next
- For Add permissions, search for and select the previously created policy
- Choose Next
- For Role name, enter a name for your role. For this example, type AmazonECSTaskS3BucketRole
- Click Create role
- If you review the Trust relationships and Permissions for the role. The trusted entity will be the ecs-tasks.amazonaws.com service and your permission policy is attached.
Please refer to the AWS Documentation for further information about IAM roles for tasks.
Create a new task definition
Create a new task definition, but this time specify the Task role AmazonECSTaskS3BucketRole.

The task definition references the task role AmazonECSTaskS3BucketRole

From the General configuration of the task definition, you will now see that Task role and Task execution role reference IAM roles.
If the container is re-run, because the container assumes the permissions of the task role, we now see the object foo.html in the S3 bucket. The environment variable AWS_CONTAINER_CREDENTIALS_RELATIVE_URI is also set.
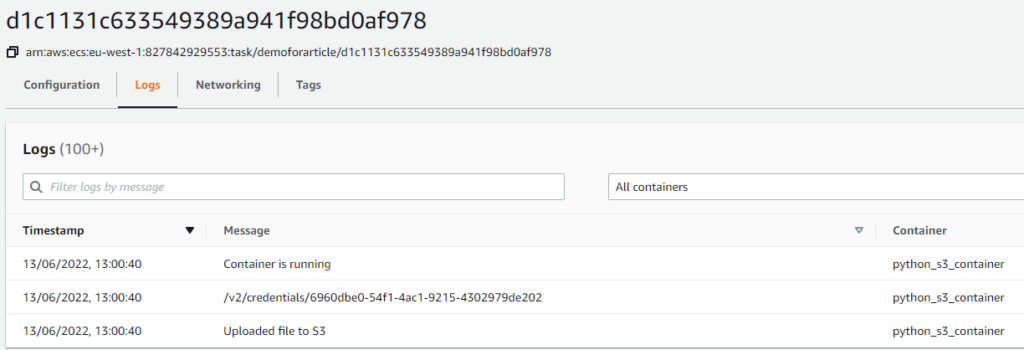
By setting the Task role, our containerized application has the permissions to write to the S3 bucket
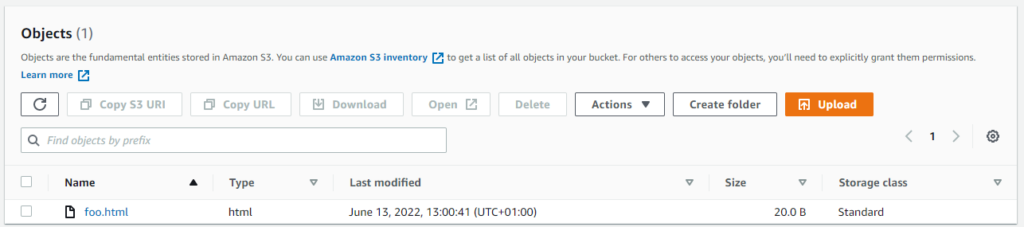
The object foo.html is in the Amazon S3 bucket
We successfully ran the containerized Python script by creating a task definition that references a task role. From a security perspective, we have provided the least privileged permissions. If you changed the Python script to read from the S3 bucket, it would fail due to the lack of permission. The CloudWatch logs below are from after updating the Python script from s3_client.put_object to s3_client.get_object. A GetObject operation permission error occurs because the Task role policy only permits PutObject permissions.
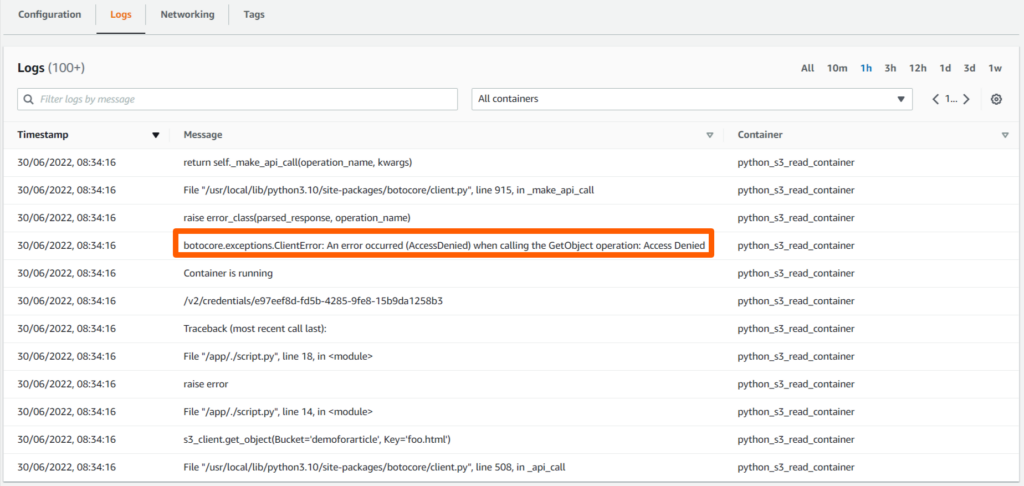
Editing the Python script to read the object (foo.html) fails due to a lack of permissions
Separation via IAM
During our demonstrations of using Amazon ECR and Amazon ECS, we acted as both the administrator and the developer. In a controlled setting, combining roles like this is an entirely acceptable means to aid understanding. But in a production setting, it is essential to utilize Amazon IAM to provide proper isolation and separation.
In the AWS documentation, these examples for Amazon Elastic Container Service provide a good overview of how IAM can integrate with Amazon ECS. The task definitions can be referenced in the IAM policies and have Amazon Resource Names (ARNs) like the below.
arn:aws:ecs:<region>:<account>:task-definition/demoforarticle_task_with_role:1
Developers can sometimes be limited to running containers on specific Amazon ECS clusters or task definitions. Doing so ensures that developers cannot alter the permissions that an application inherits during runtime. At the same time, a separate administrator would be able to create the task definitions.
|
Platform
|
Provisioning Automation |
Security Management |
Cost Management |
Regulatory Compliance |
Powered by Artificial Intelligence |
Native Hybrid Cloud Support
|
|---|---|---|---|---|---|---|
|
AWS Native Tools |
✔
|
✔
|
✔
|
|||
|
CoreStack
|
✔
|
✔
|
✔
|
✔
|
✔
|
✔
|
Conclusion
This article introduced several container security considerations, including container threat modeling, the importance of trustworthy base images, and iterative vulnerability scanning. Ideally, security practices should be factored into each stage of container development as a matter of course.
Threat modeling is a powerful approach that provides insight into container security by forcing you to consider the following:
- application assets: is any sensitive data exposed?
- internal and external actors: the people that develop and use your application. Are the container base images from a trustworthy developer? Perform vulnerability scanning using Docker and Amazon ECR to be sure
- entry/exit points: could an entry point be exploited?
During this article, we took a simple containerized Python script and used it to demonstrate the functioning of some popular AWS Services. We also explained how an IAM task role could provide AWS credentials to a container at runtime. Our runtime credentials enabled the Python script to write to an Amazon S3 bucket, and we used Amazon CloudWatch to capture logs from the running container.
By taking advantage of how Amazon IAM works with Amazon ECR and Amazon ECS, you can grant different teams just the IAM permissions they need to get the job done. Good role and capability separation also provide security benefits by preventing the unauthorized alteration of container infrastructure. Your IAM policies should, therefore, always follow the principle of least privilege.
When using AWS for your container workloads, you are ultimately responsible for the security of your data, network, and runtime, as well as logging and monitoring. See here for Amazon's official definition of Shared Responsibility.